Guide in progress

This guide is still being written.

This first pass provides a short introduction to each major Patchbook area. We will expand the instructions, add images, and include step-by-step examples as the guide develops.

Patchbook User Guide

Learn Patchbook, one workspace at a time.

Start with the area you are working in now. Each section explains what the workspace is for and the first steps to take when using it.

01

Fixtures

Build the fixture list and define the reusable information that supports it.

Worksheet

The worksheet is Patchbook’s core workspace and the primary interface for editing fixture data. It combines directly editable fields with derived and imported fields from other areas of Patchbook, giving users a comprehensive view of fixture data.
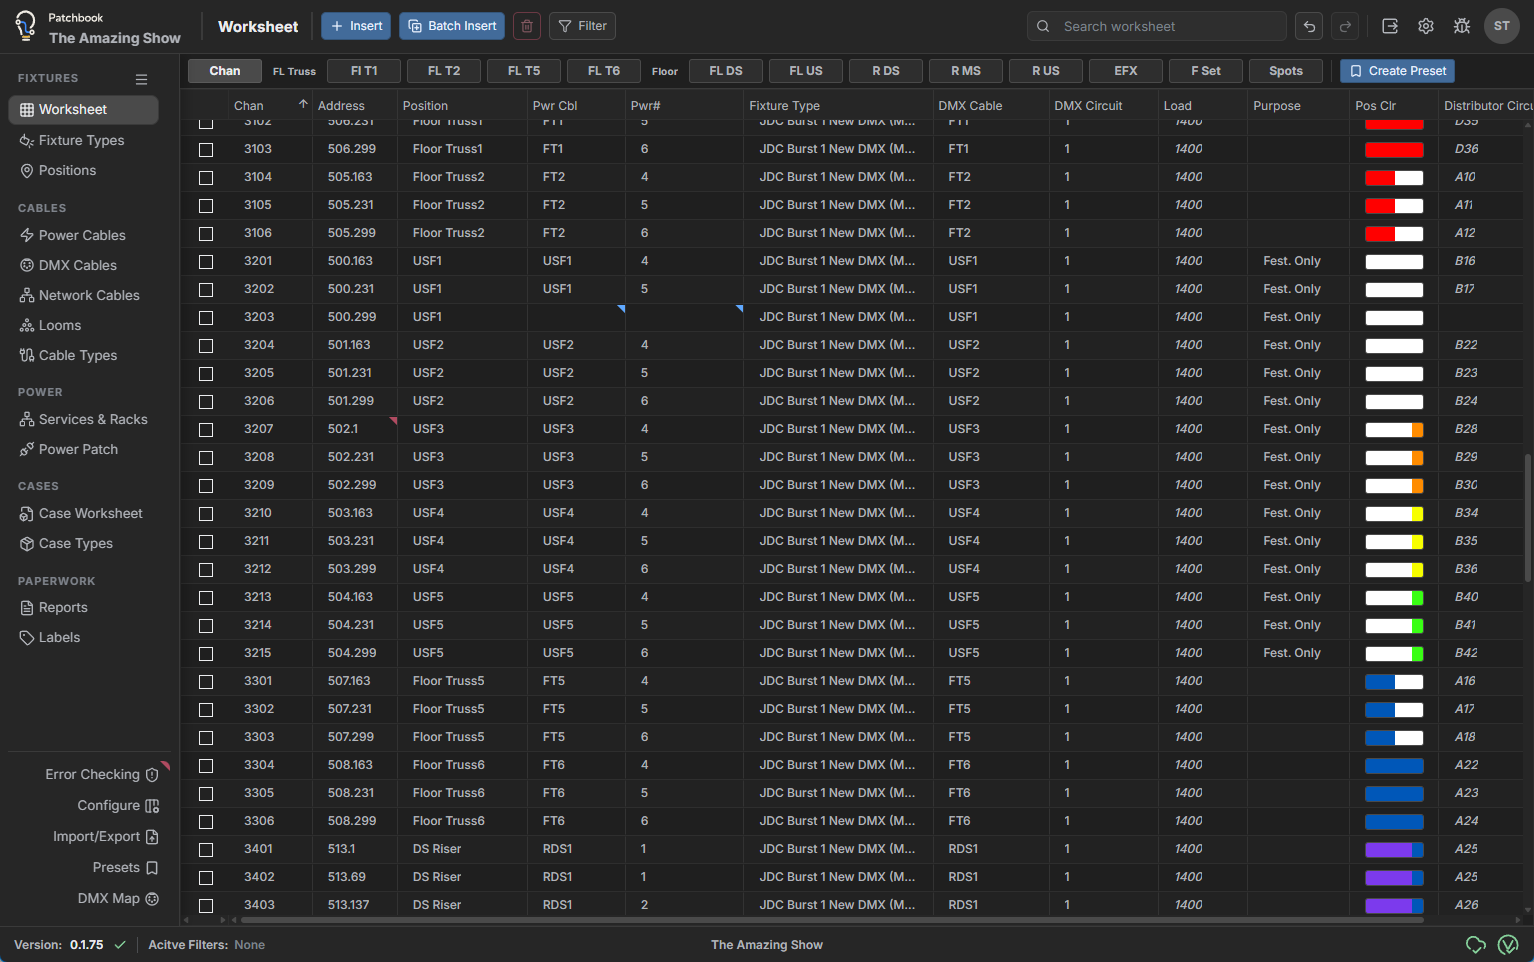
Patchbook Worksheet showing fixture channels, positions, power, DMX, and distributor circuits

Batch Editing

Click and drag to select multiple rows within a column. Alternatively, click a field, then hold Shift and use the Up or Down Arrow key to select additional rows. When multiple rows are selected, entering a value applies it to every selected row.

Batch Sequential Editing

Patchbook supports direct sequential editing with an explicit plus (+) modifier when multiple data rows are selected. Without that modifier, the value is copied unchanged to every selected row.

  • With multiple rows selected (see Batch Editing above), appending + applies sequential numbering or lettering to the selected fields.
    • “1+” yields 1, 2, 3, etc.
    • “A+” yields A, B, C, etc.
    • “Flat 4+” yields Flat 4, Flat 5, Flat 6, etc.
  • Add a numeric step after + to increment the sequence by that amount. Step modifiers are not supported for alphabetic values.
    • “1+6” yields 1, 7, 13, etc.
  • Ordinary values are not sequences. For example, entering “Flat 4” puts exactly “Flat 4” in every selected row.
  • Special fields. Some fields such as address behave differently when batch sequential editing is used.
    • Address: Using + on an address field will apply an offset defined by the fixtures assigned fixture mode (See Fixture Types). If the selected fixture mode has a footprint of 12 DMX addresses, and edit like “1.20+” will result in 1.20,1.34,1.46 etc.

Undo / Redo

Undo (Ctrl+Z) and Redo (Ctrl+Y) are available for the 100 most recent edits. Multi-row edits are grouped as a single edit sequence. Undo and Redo buttons are also available in the upper-right corner of the interface.

Undo and Redo buttons

Fixture Types

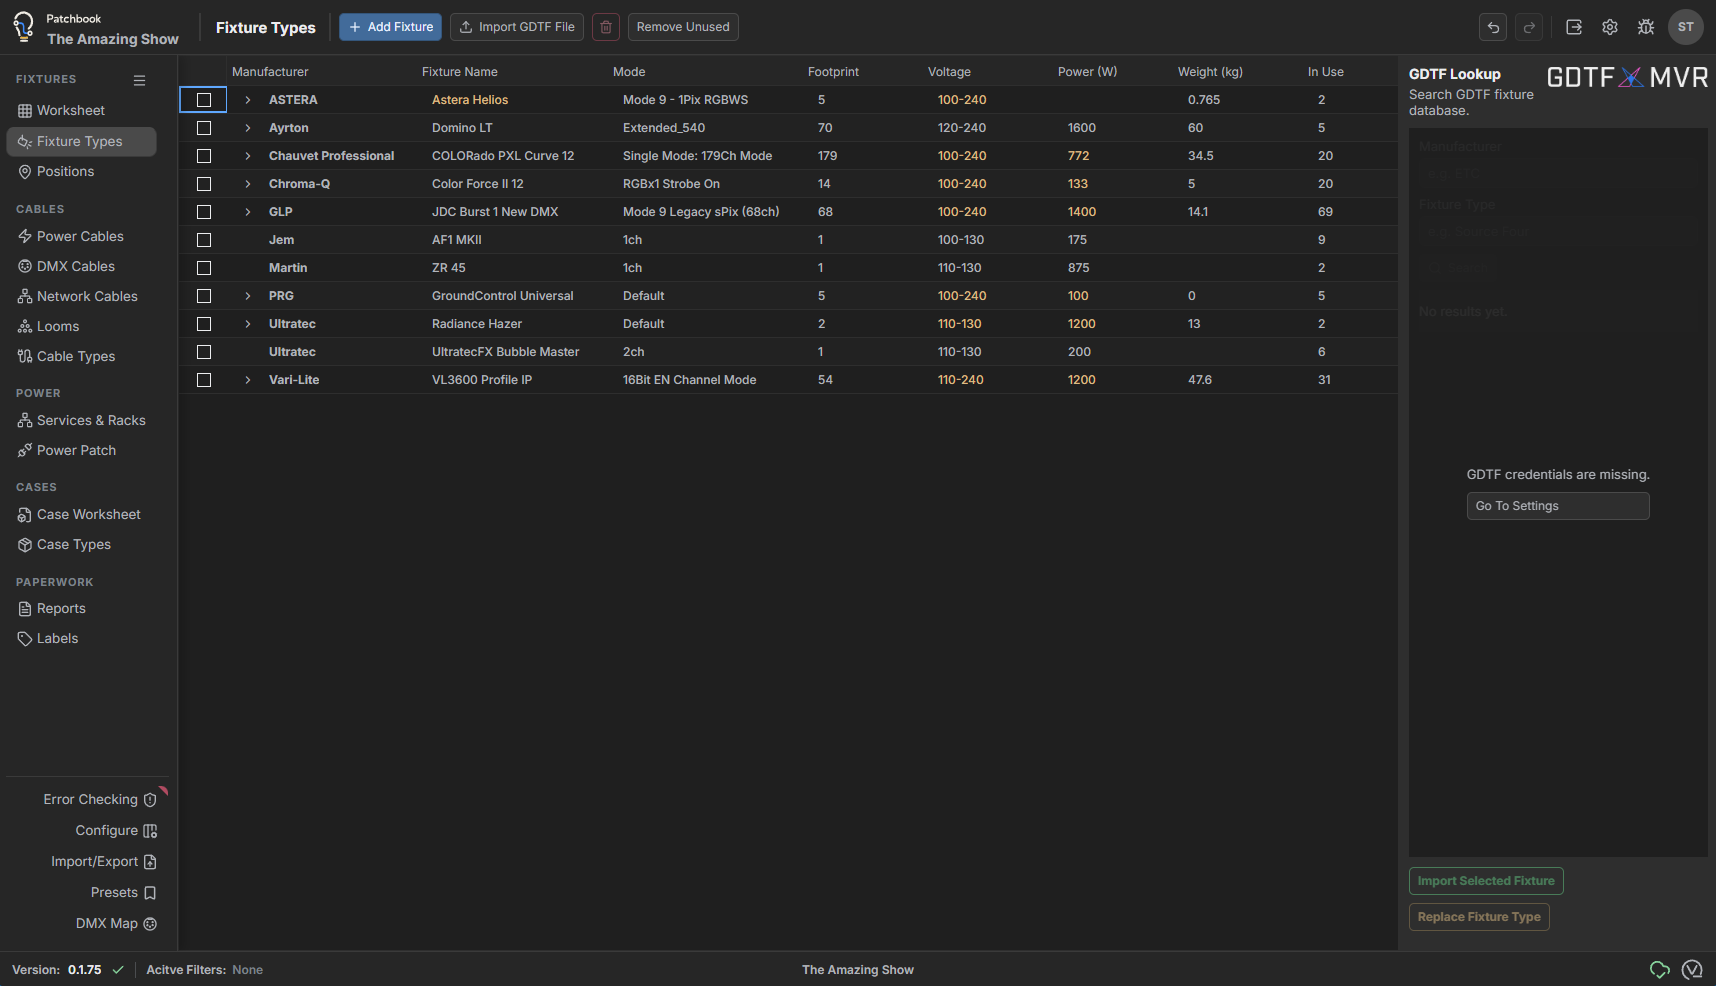
The Fixture Types worksheet is where fixture types and their modes are managed. Add fixture types manually with the Add Fixture button, import a GDTF file, or use Search GDTF to find a profile in the GDTF database.

Patchbook Fixture Types worksheet showing manufacturers, modes, footprints, voltage, power, and GDTF lookup

Data Fields

These parameters define each fixture type. Because GDTF profiles may not include every value, manually enter any missing information—especially power specifications—to support accurate error checking and reporting.

  • Manufacturer – The fixture manufacturer. Used in reports.
  • Fixture Type – The fixture type name shown in worksheet selection menus.
  • Mode – The fixture mode. Define it manually or select a mode provided by the imported GDTF profile.
  • Footprint – The number of DMX channels used by the selected mode. Enter this value manually for user-defined fixture types.
  • Voltage – The fixture’s operating voltage or voltage range. Use a hyphenated range, such as 100-240. Patchbook uses this value to validate distributor circuit selections and perform error checks.
  • Wattage – The manufacturer’s maximum power-consumption specification. Patchbook uses this value in power calculations.

Manually Adding a Fixture

Select Add Fixture to create a fixture type manually. Enter the DMX footprint for each mode so automatic patching and error calculations work correctly.

Importing a GDTF File

Select Import GDTF File to import a local GDTF profile. The imported fixture defaults to the first mode defined in the file.

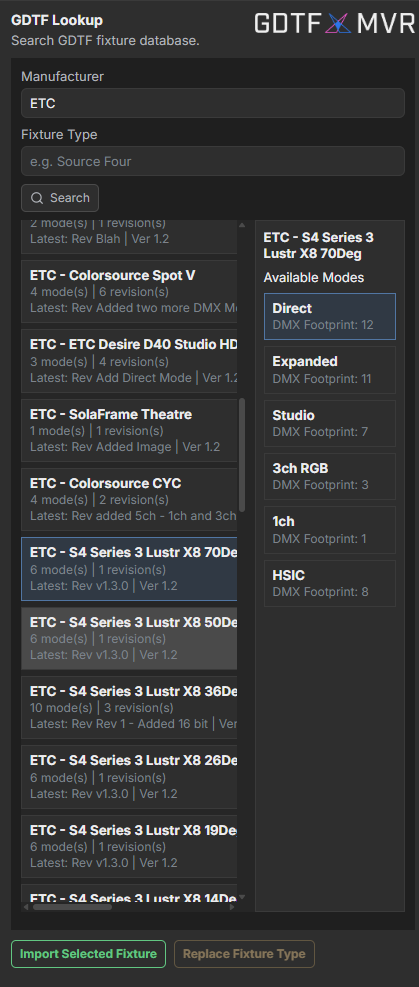
GDTF Lookup search results showing fixture types and available modes

Searching the GDTF Database

When connected to the internet, use GDTF Lookup to find profiles in the GDTF database. Configure your GDTF login credentials in Settings before searching. Searches are case-insensitive but require direct matches. Search by manufacturer, fixture name, or both; if no result appears, simplify the terms or use partial names to account for naming variations.

  • Drag a fixture type or fixture mode from the search results to the fixture list. Dragging a fixture type selects its first mode automatically; dragging a specific mode imports the fixture with that mode selected.
  • Select one or more search results, then choose Import Selected Fixtures to import the selected fixture types and modes.
  • To replace a fixture type already in the fixture list, select it and choose Replace Fixture Type. The selected fixture type is overwritten with the imported profile.

Overriding Imported Values

You can override any value imported from GDTF, regardless of how the fixture was added. Overridden values appear in orange to indicate that they differ from the imported defaults.

Positions

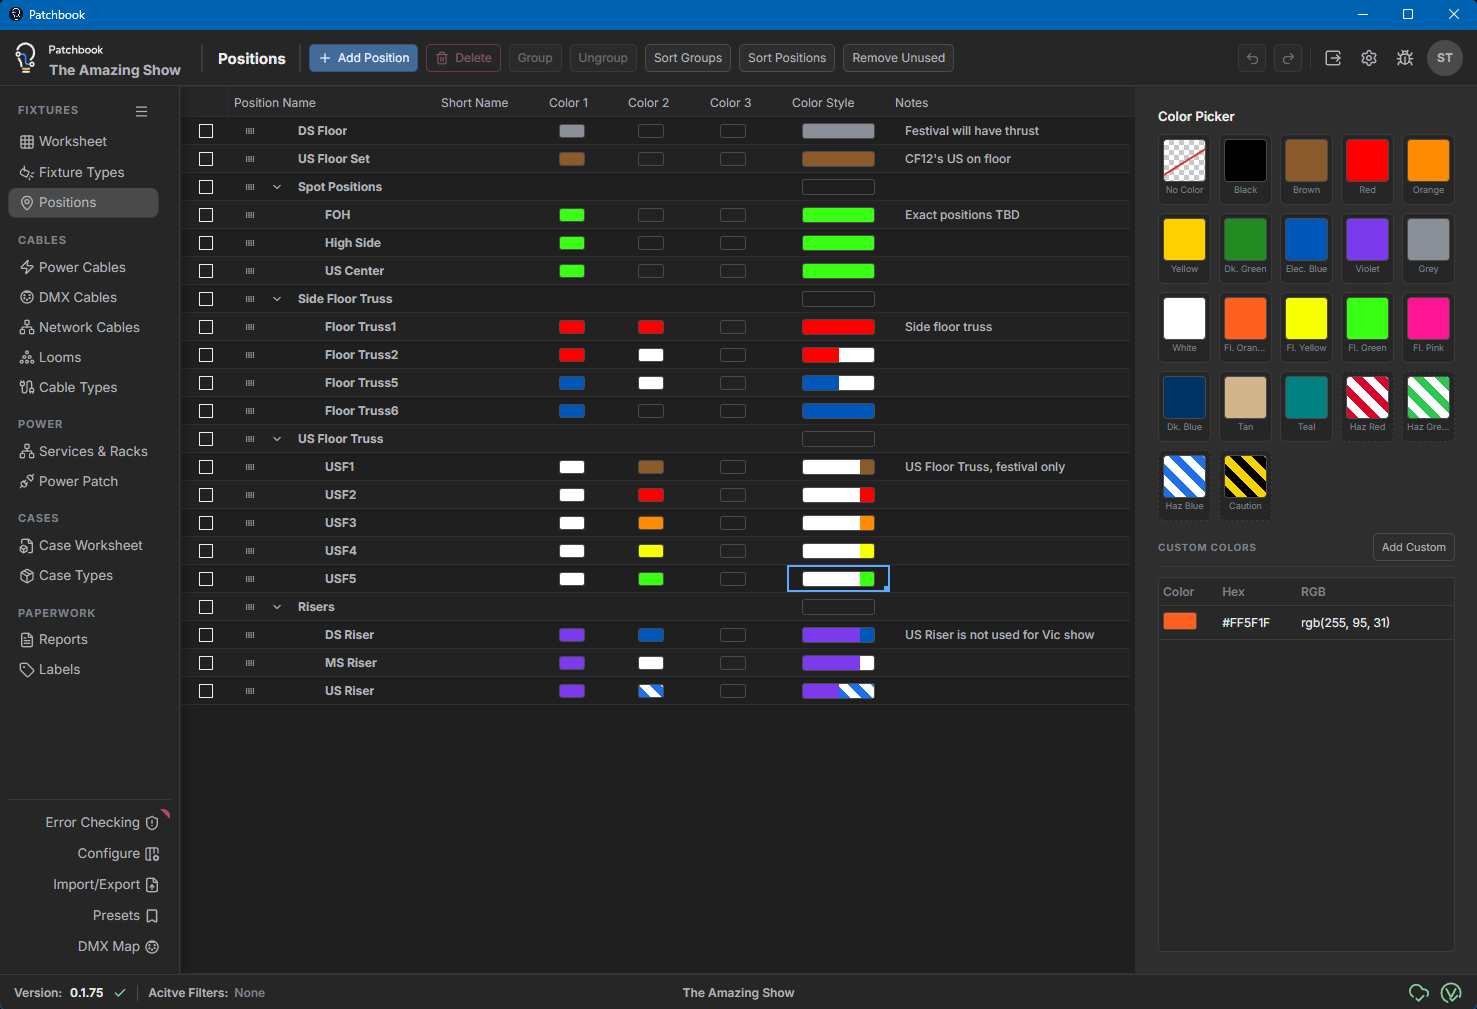
Use the Positions worksheet to define show positions and their attributes. Positions are reused in reports, the fixture Worksheet, and cable tools. Their order and grouping control how position-based reports and selectors are arranged, while position colors provide a baseline for logical cable coloring.

Patchbook Positions worksheet showing grouped positions, short names, three color fields, color styles, notes, and the color picker

Color Fields

Each position can use up to three colors. Select the Color 1, Color 2, or Color 3 cell you want to change, then choose a swatch in the Color Picker. To clear a color, select its cell and press Delete, or choose No Color.

Color Type

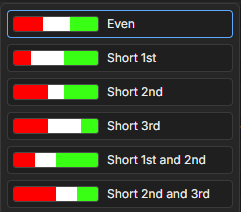
The Color Style field controls how one, two, or three selected colors are divided across the position preview. Use the wide and narrow band options to match the identification tape or banding used on the physical position.

Patchbook Color Style options showing even and short color-band arrangements

Sorting and Grouping

Drag position rows to set their display order, or choose Sort Positions for alphabetical order. Use Group and Ungroup to organize related positions, and Sort Groups to arrange group names alphabetically. Position and group order are reused in reports and other position-aware areas of Patchbook.

02

Cables

Plan the signal and power connections that turn the fixture list into a physical system.

Power Cables

Use Power Cables to document the cable paths that deliver power to fixtures and other equipment. Build each run from the available cable types and lengths so Patchbook can calculate the physical parts and cable counts the show requires.

DMX Cables

Use DMX Cables to describe the signal path between control, distribution, and fixtures. Record each connection with the appropriate cable type and length so the plan can be checked and included in cable paperwork.

Network Cables

Use Network Cables for Ethernet and other networked control connections in the show. Define the route and cable parts just as you would for DMX, keeping network infrastructure visible alongside the rest of the system.

Looms

Looms group related cable runs into a physical bundle that can be prepared and handled as one unit. Add the required cable parts, identify the endpoints, and use the finished loom in planning and paperwork.

Cable Types

Cable Types defines the connectors, categories, and standard lengths available when building cable runs. Set up the cable inventory used by the show before creating paths, or add reusable types from your User Library.

03

Power

Describe the electrical distribution system and connect fixture load to its circuits.

Services & Racks

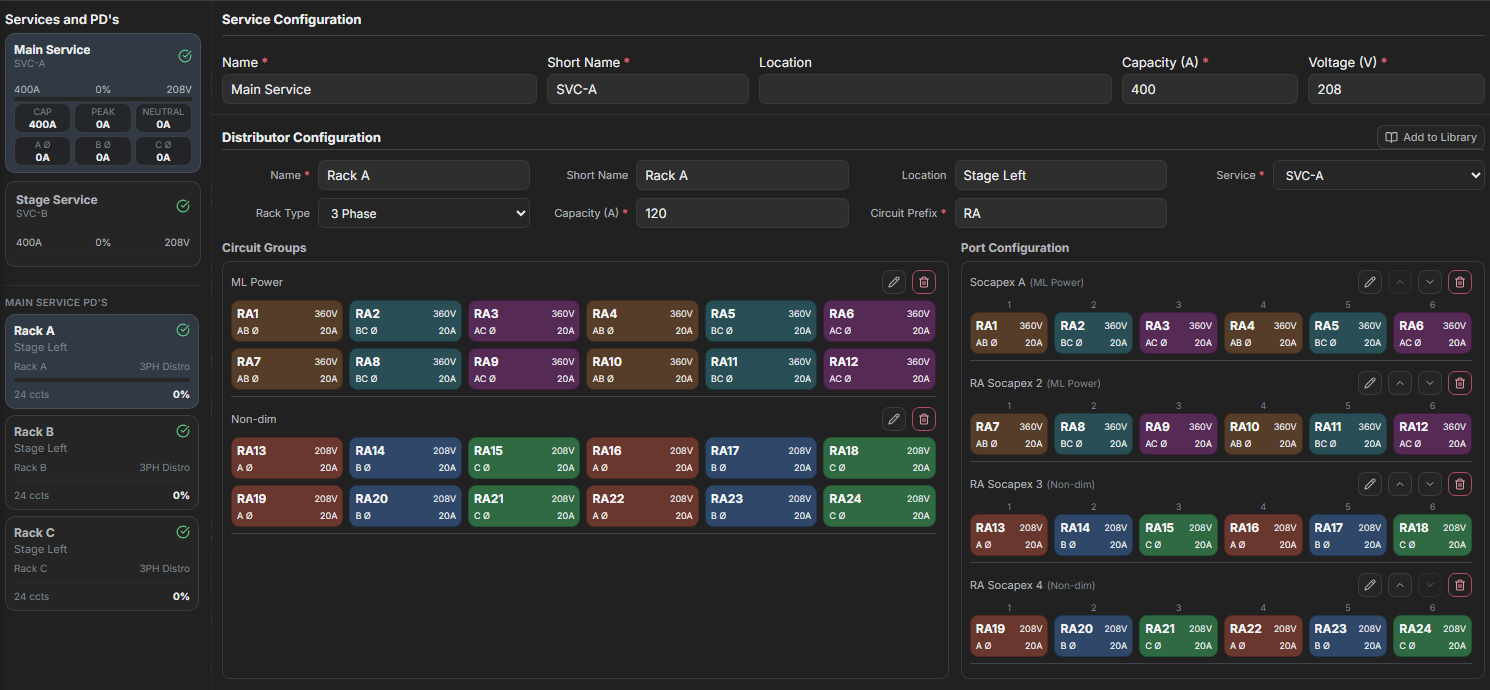
Build the show's electrical distribution here before assigning any power cables. A service describes the incoming supply; each distributor (PD or rack) belongs to a service and provides the circuits and ports used in Power Patch.

Services and Racks workspace with selected Main Service and Rack A, service and distributor settings, circuit groups, and port configuration

Create a service and distributor

Select Service in the toolbar to add the incoming supply, then enter its name, capacity, and voltage in Service Configuration. Select Distributor to create a custom rack or apply a standard or User Library template. Set its service, rack type, capacity, and circuit prefix in Distributor Configuration. Field edits save automatically. Choose a card in the left column to return to an existing service or distributor.

Build circuits and ports

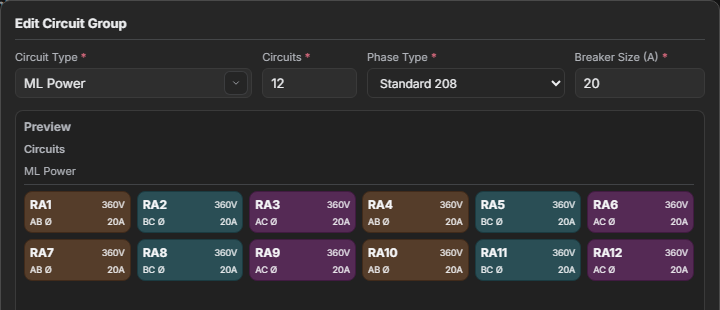
With a distributor selected, use the toolbar Circuits action to choose a circuit type, count, phase type, and breaker size. Review the preview before saving. You can create ports with a new circuit group or use Ports to map existing circuits to a port. The Circuit Groups and Port Configuration areas show the resulting labels and order; use their edit controls to make changes.

Circuit group editor showing circuit type, count, phase type, breaker size, and a preview of the resulting circuits

Check available capacity

Service and distributor cards show connected load against their configured capacity. The phase figures and status indicator help you spot an uneven or overloaded system as fixture load is patched. A service's voltage is used for its distributors' circuit calculations, so check that setting before patching.

Power Patch

Power Patch connects each logical power cable circuit to a distributor circuit or compatible port. Fixture load flows through those cable assignments, so start with the services, distributors, and circuits defined in Services & Racks.

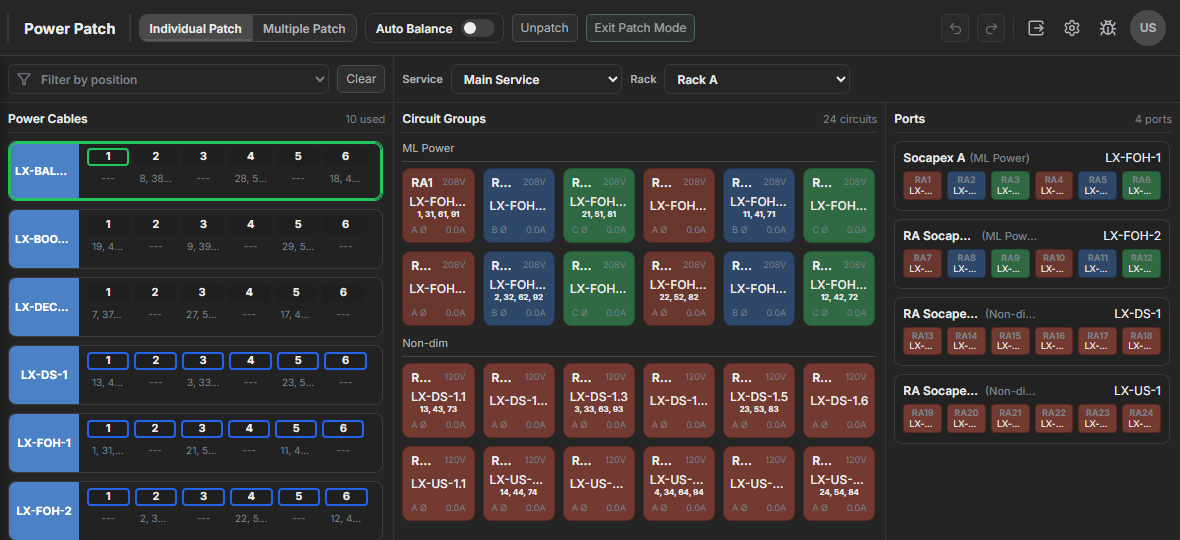
Power Patch workspace with an active cable outlined in green, cable circuit numbers on the left, distributor circuit groups in the center, and ports on the right

Choose a cable and destination

The left column lists power cables used by fixtures. Filter by position when you want a smaller list, or select Clear to show them all. Above the rack, choose the destination Service and Rack. Circuit groups are in the center; ports are on the right. A port can accept a cable only when its circuit count is compatible.

Patch the cable

For one circuit at a time, select Individual Patch, click a cable, then click each destination circuit in order. For a consecutive run, select Multiple Patch, click the cable, then click its starting rack circuit. You can also click a compatible port to patch the cable across that port's circuits. Turn on Auto Balance when multiple or port patching should spread fixture load across the available targets.

Review or remove assignments

The active cable has a green outline, while blue cable circuit numbers indicate existing patches. Circuit cards show their assigned cable labels and fixture channel ranges. To remove an assignment, choose Unpatch and click a connected cable, circuit, or port; you can also right-click a patched item and select Unpatch. Select Exit Patch Mode or press Escape when finished.

04

Cases

Plan how show equipment will be grouped, packed, and moved.

Case Worksheet

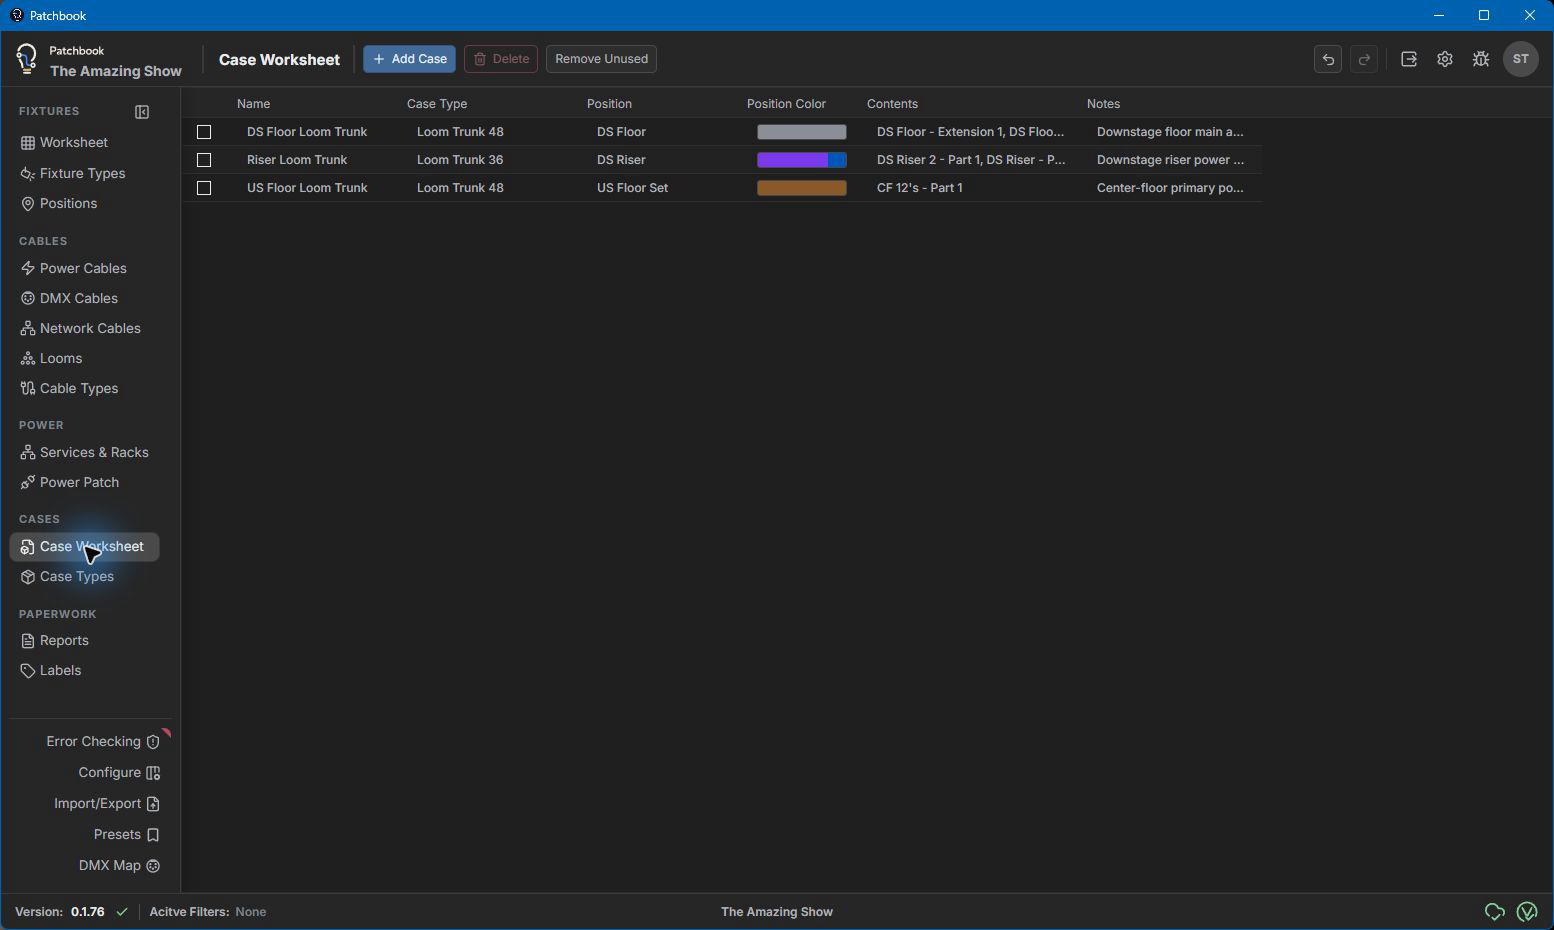
The Case Worksheet is the show's packing view for loom sections and extensions. Create and name each case here, then assign its type and destination position. The Contents column updates automatically from the assignments made in Looms.

Patchbook Case Worksheet showing named loom trunks, case types, positions, position colors, contents, and notes

Data Fields

Each row represents one physical case in the active show. Use the worksheet fields to identify the case and make its destination and packed loom sections clear to the crew.

  • Name – The unique name used to identify the case in this show.
  • Case Type – The reusable container definition assigned to the case. You can select an existing type or type a new name to create one when the edit is saved.
  • Position – The show position where the case is intended to travel or be used.
  • Position Color – A read-only color marker inherited from the selected position.
  • Contents – A read-only list of the loom parts and extensions assigned to the case in Looms.
  • Notes – Packing, handling, or destination details that should travel with the case record.

Adding and Editing Cases

Select Add Case to create a row, then edit its cells directly. Give each case a concise, recognizable name and assign a Case Type and Position before packing contents. Undo and Redo are available from the controls in the upper-right corner.

Assigning Contents

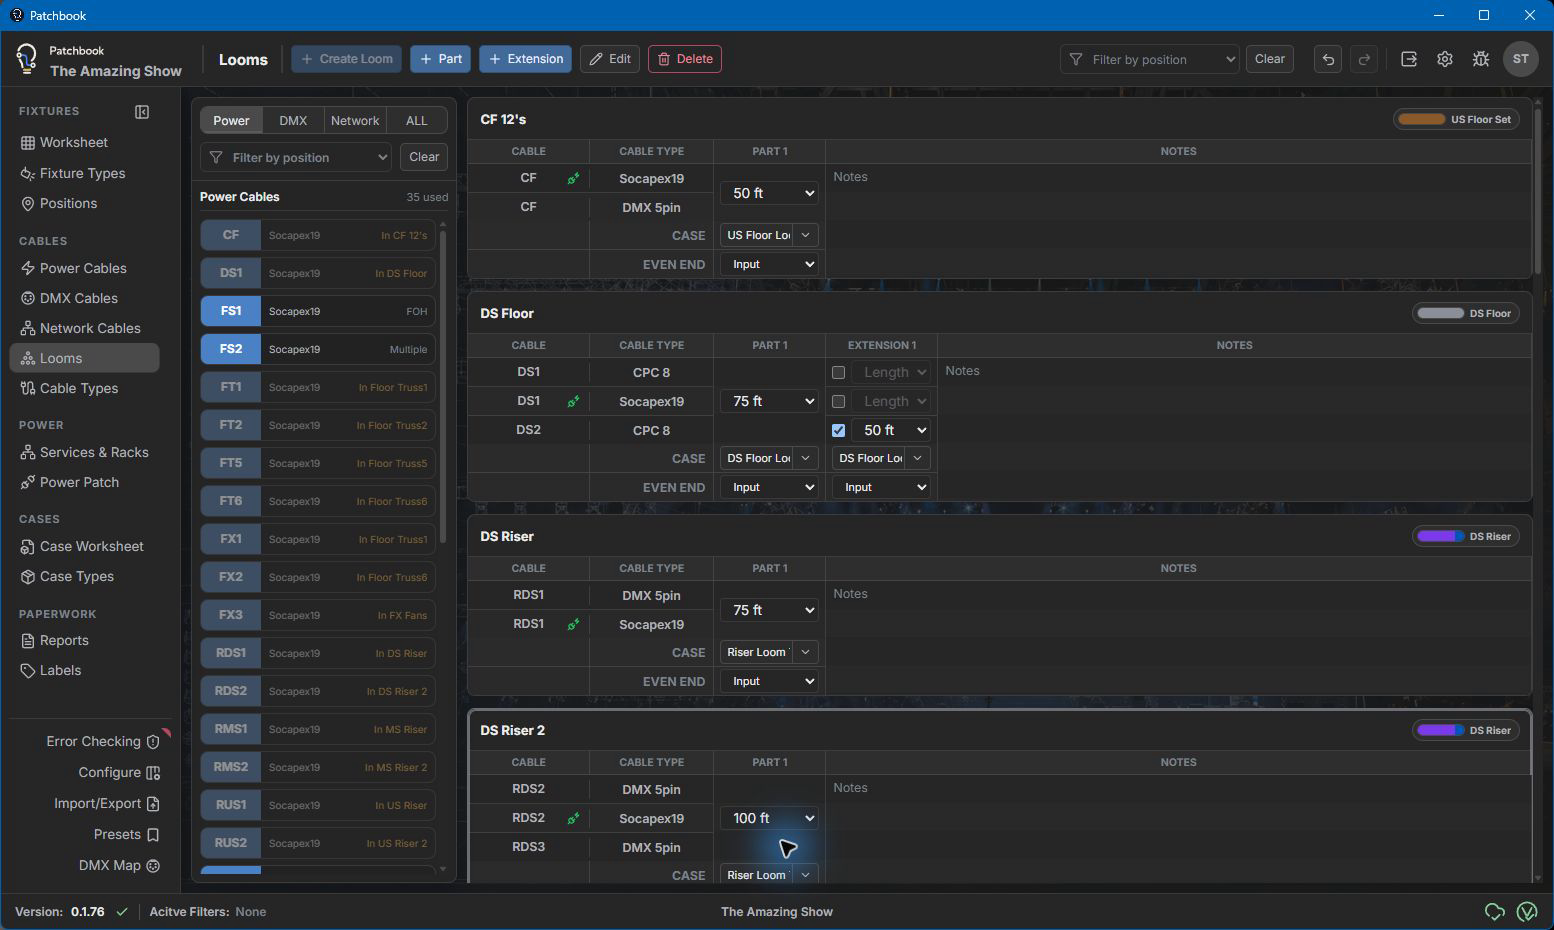
Contents are assigned from Cables > Looms, not typed into the Case Worksheet. In each loom card, use the Case selector below a Part or Extension to choose its road case. Return to the Case Worksheet to review the completed packing list.

Patchbook Looms workspace showing case selectors for primary loom parts and an extension

Deleting and Cleaning Up

Select an empty case and choose Delete to remove it. Cases that still contain a loom, part, or extension are protected from deletion. Remove Unused removes every empty case while preserving cases that contain assigned items.

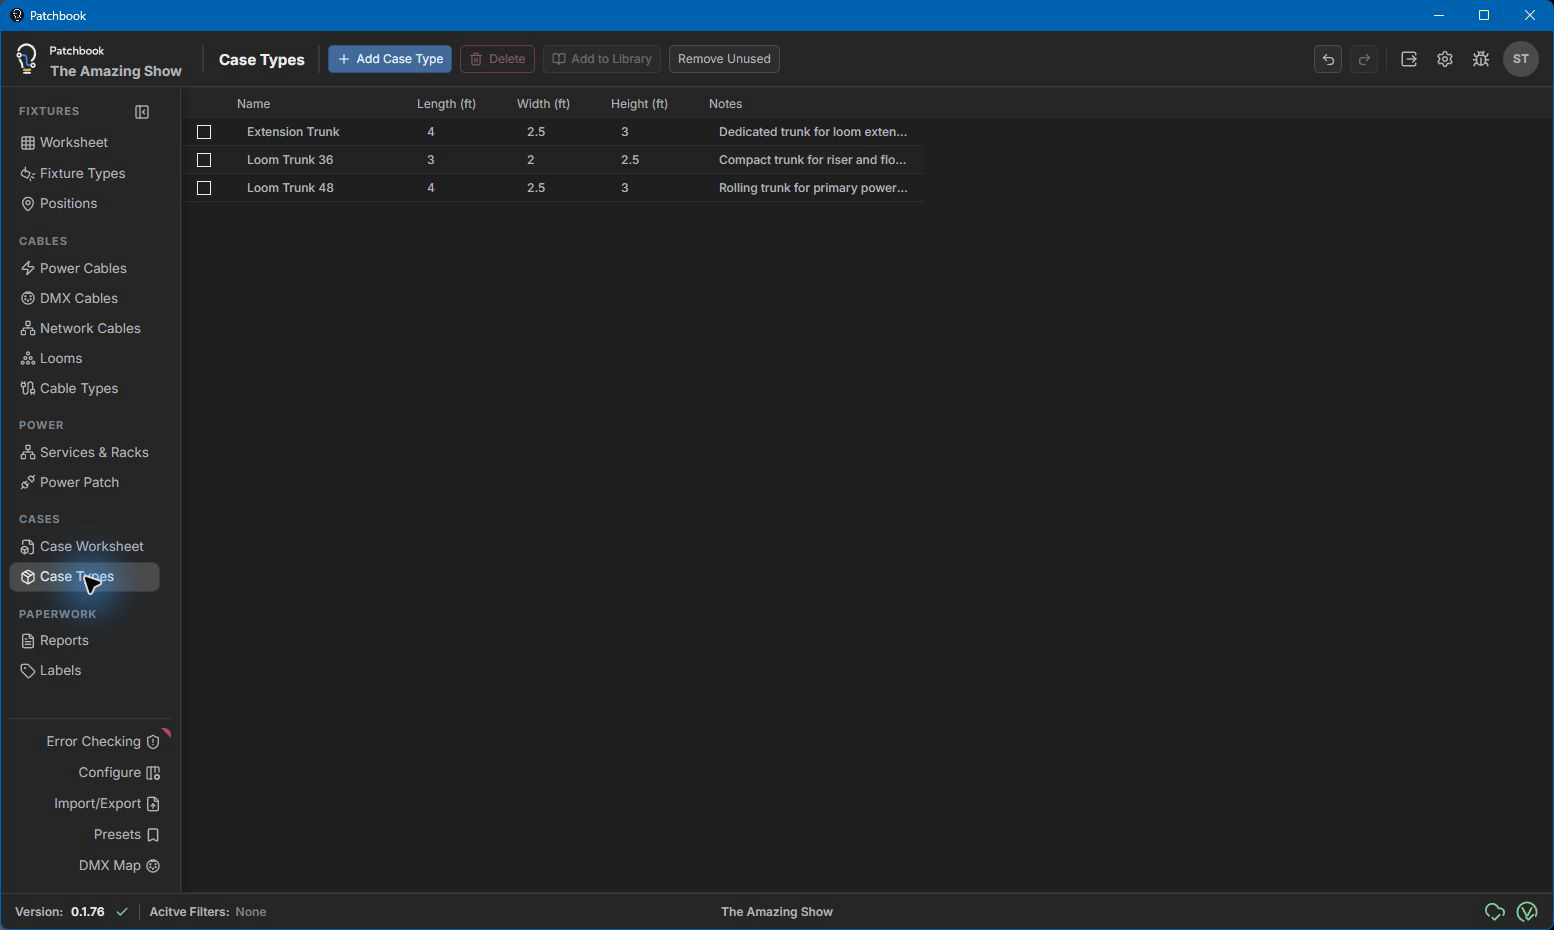
Case Types

Case Types defines the reusable containers available to the active show. Record a clear name, dimensions, and useful notes once, then apply that definition to as many individual cases as needed in the Case Worksheet.

Patchbook Case Types worksheet showing reusable loom trunk names, dimensions in feet, and notes

Data Fields

Case Types keeps the physical details of standard containers separate from the named cases used by one show.

  • Name – The reusable case-type name shown in the Case Worksheet selector.
  • Length, Width, and Height – The case's outside dimensions in the measurement system selected for the show.
  • Notes – Construction, caster, lid, handling, or other details that distinguish the container.

Adding a Case Type

Select Add Case Type, replace the temporary name, and enter the dimensions and notes directly in the row. A type can also be created by entering a new Case Type name in the Case Worksheet; return here afterward to complete its dimensions and notes.

Adding to the User Library

Select one or more completed definitions and choose Add to Library to make those case types available for other shows. Library copies preserve the name, dimensions, and notes.

05

Paperwork

Turn the current show data into documents and labels for the shop, venue, and crew.

Reports

Reports turns live show data into fixture, position, cable, power, and other production schedules. Choose or create a report definition, arrange the information the crew needs, and regenerate the output whenever the show changes.

Labels

Labels creates printable labels from fixture, cable, case, and other show records. Select a label stock and design, place the desired fields in the editor, then generate the labels from the current data.

06

Worksheet Tools

Use the lower-left tools to review, reshape, exchange, and visualize fixture data.

Error Checking

Error Checking reviews the active fixture list for problems such as missing information or overlapping DMX addresses. Open the panel to review each result, isolate affected rows, and choose which checks should warn you or block the workflow.

Configure Worksheet

Configure Worksheet controls which fields appear in the grid and how they are presented. Show, hide, arrange, and size columns so the Worksheet matches the task at hand without changing the underlying fixture data.

Import / Export

Import / Export moves show information between Patchbook and supported file formats such as CSV and MVR. Preview incoming data and its field mapping before committing it, and use exports when another person or application needs a portable copy.

Worksheet Presets

Worksheet Presets saves a useful combination of columns, widths, ordering, filters, and sorting. Apply a preset to switch quickly between tasks, or save a reusable copy to the User Library for another show.

DMX Map

DMX Map provides a visual view of address use across the show’s universes. Use it to find open space, understand fixture footprints, and spot overlaps or other addressing problems before they reach the console.

07

Library and Connected Work

Reuse your standards, connect Vectorworks, and work with collaborators across devices.

User Library

The User Library keeps reusable colors, cable lengths and types, case types, worksheet presets, power-distributor templates, reports, and labels outside any one show. Save standards here when you want to use them again, then add individual items or complete groups to the active show.

Vectorworks Integration

Install the Patchbook plug-in for your platform, create an API key in Settings, and use that key to connect Vectorworks Spotlight to the running Patchbook application. Once connected, exchange supported fixture changes in either direction and review conflicts instead of silently replacing newer work.

Cloud Sync and Sharing

Cloud Sync keeps supported show information current between Patchbook installations and the web application. Share a show with a user’s Patchbook email address, choose the appropriate permission, and find shows shared with you under Shared Shows in the show picker.